
How to Download and Install Java on Windows 64-Bit Machine?
Java continues to be one of the most popular programming languages in the world, known for its simplicity, portability, and platform independence. Whether you’re a beginner or an experienced developer, Java remains a top choice for creating robust and versatile applications.
In this guide, we’ll walk you through the step-by-step process of downloading and installing Java on a Windows 64-bit system. Additionally, we’ll address common questions like:
- What is the latest version of Java?
- How to install Java on Windows 7, 8, or 32-bit systems?
- How to switch from 32-bit Java to 64-bit Java?
Let’s get started!
Steps to Download Java on a Windows 64-Bit Machine
Follow these steps to download Java for your system. These steps were tested on Windows 10 but are similar for other versions like Windows 7, 8, and 11.
Step 1: Visit the Official Oracle Java Downloads Page
Open your browser and navigate to the Oracle Java Downloads page. This is the official website where you can access the latest Java Development Kit (JDK) versions.

Step 2: Select the JDK Version
Scroll down to find the version of Java you want to download. Click on the JDK Download button corresponding to your desired version.

Step 3: Choose the 64-Bit Installer
On the next page, locate the download link that matches your system specifications. For a 64-bit machine, ensure the file name ends with x64.
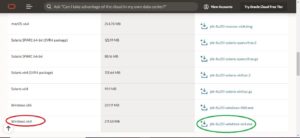
Before downloading, you’ll need to accept the Oracle Technology Network License Agreement by checking the box. Once accepted, proceed with the download.

Also read: Java 21 Hidden Features
Steps to Install Java on a Windows 64-Bit Machine
After successfully downloading the Java installer, follow these steps to install it:
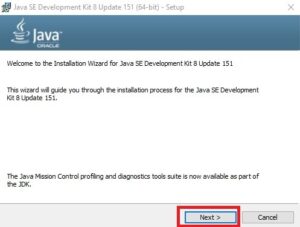
Step 1: Run the Installer
Locate the downloaded file and double-click to run the installer. The Java installation wizard will appear. Click Next to proceed.
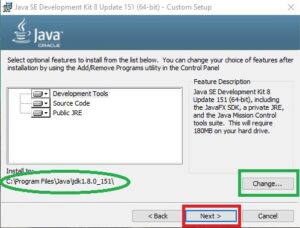
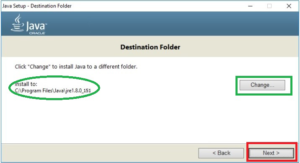
Step 2: Choose the Installation Directory
By default, Java will be installed in the recommended directory. You can change this location by clicking the Change button or continue with the default directory by clicking Next.
Step 3: Install the Java Development Kit (JDK)
The installation process will begin. Wait for it to complete.

Step 4: Set Up Java Runtime Environment (JRE)
The wizard will prompt you to choose a directory for the Java Runtime Environment (JRE). Again, you can either use the default directory or specify a custom location.
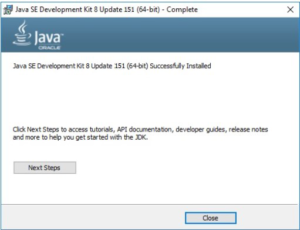
Step 5: Finish the Installation
Once the installation is complete, you’ll see a confirmation message. Click Close to finish the setup.
Step 6: Verify Java Installation
To ensure Java is installed correctly, open the Command Prompt (CMD) and type:
java -version
If the installation is successful, the Java version details will be displayed.
Conclusion
Installing Java on a Windows 64-bit machine is a straightforward process, even for beginners. With these steps, you can set up Java quickly and begin working on your projects.
Helpful article